
This page was last updated: September 25, 2023
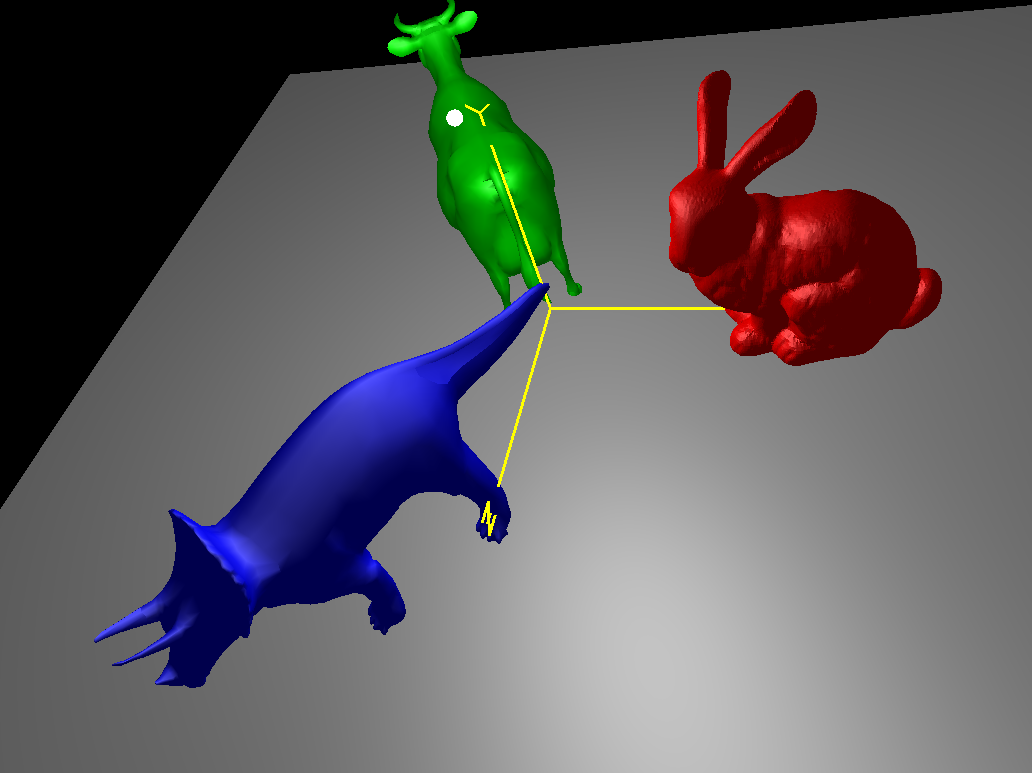
The goal of this project is to create a 3D scene that demonstrates an animated OpenGL light source.
When you are done with this assignment, you will understand how to add dynamic light sources to your programs so that the viewer can better see the three-dimensionality of the scene. This is also great to know because oftentimes a major part of the storyline in games and movies is controlled by what the user can see and how well they can see it.
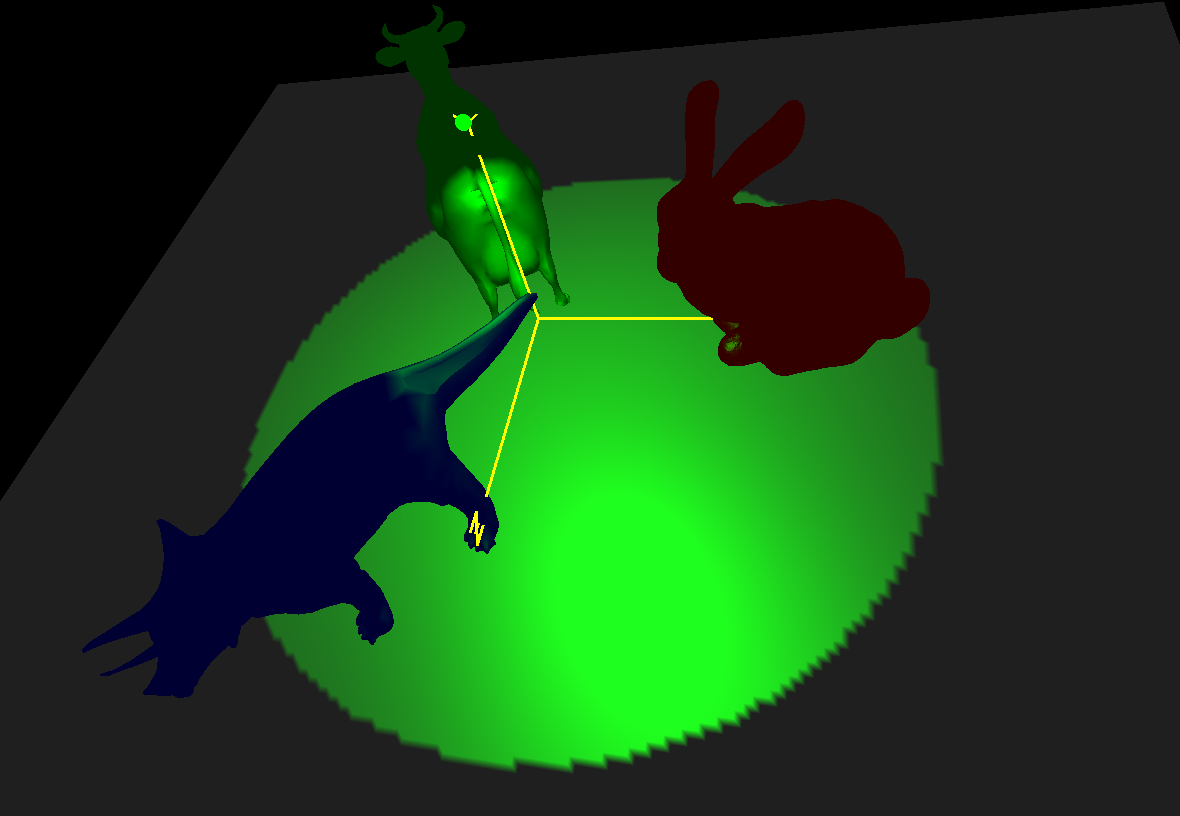
The purpose of the grid is to have somthing planar for the light to shine on. This makes it easier to see what the effect of the light is. Exactly how you do this is up to you. Something like this works well:
#define XSIDE	?????			// length of the x side of the grid
#define X0      (-XSIDE/2.)		// where one side starts
#define NX	?????			// how many points in x
#define DX	( XSIDE/(float)NX )	// change in x between the points

#define ZSIDE	?????			// length of the z side of the grid
#define Z0      (-ZSIDE/2.)		// where one side starts
#define NZ	?????			// how many points in z
#define DZ	( ZSIDE/(float)NZ )	// change in z between the points

GridDL = glGenLists( 1 );
glNewList( GridDL, GL_COMPILE );
        SetMaterial( 0.6f, 0.6f, 0.6f, 30.f );
        glNormal3f( 0., 1., 0. );
        for( int i = 0; i < NZ; i++ )
        {
                glBegin( GL_QUAD_STRIP );
                for( int j = 0; j < NX; j++ )
                {
                        glVertex3f( X0 + DX*(float)j, YGRID, Z0 + DZ*(float)(i+0) );
                        glVertex3f( X0 + DX*(float)j, YGRID, Z0 + DZ*(float)(i+1) );
                }
                glEnd( );
        }
glEndList( );
Since you are using OpenGL's built-in per-vertex lighting, it is important that the grid have lots of vertices!
In any animating program, it is helpful for debugging to be able to freeze the animation. The 'f' key is implemented by turning the Idle Function on and off.
// a global:
bool Frozen;


// in Reset( ):
	Frozen = false;


// in Keyboard( ):
	case 'f':
	case 'F':
		Frozen = ! Frozen;
		if( Frozen )
			glutIdleFunc( NULL );
		else
			glutIdleFunc( Animate );
		break;
| 'w' | Turn the light source color to white |
| 'r' | Turn the light source color to red |
| 'g' | Turn the light source color to green |
| 'b' | Turn the light source color to blue |
| 'y' | Turn the light source color to yellow |
| 'p' | Make the light source a point light |
| 's' | Make the light source a spot light |
| 'f' | Freeze/Unfreeze the animation |
In reality, you can use any user interface that you want. We won't know how you are demonstrating the features of your program, just that it works. The keyboard table above is just a suggestion.
Deliberately time the animation like we've seen before. Here is a good way to do that. Set a constant called something like MS_PER_CYCLE that specifies the number of milliseconds per animation cycle. Then, in your Idle Function, query the number of milliseconds since your program started and turn that into a floating point number between 0. and 1. that indicates how far through the animation cycle you are. Then in Display, you might use that 0.-1. number to position the light, something like this: If you wanted to make the light move in a planar circle, you might do this:
// in the defined constants:
#define MS_PER_CYCLE  10000
#define LIGHTRADIUS = ????


// a global:
float Time;


// in Animate( ):
	int ms = glutGet( GLUT_ELAPSED_TIME );
	ms %= MS_PER_CYCLE;
	Time = (float)ms / (float)MS_PER_CYCLE;		// [0.,1.)


// in Display( ):
	float xlight = << some function of Time >>
	float ylight = << some function of Time >>
	float zlight = << some function of Time >>
	. . .
There are a lot of free .obj files on the web. There are some links at the end of the Class Resources Page. You can also find a lot of files by Googling "free obj file".
When you want to bring in a 3D object as a .obj file, use our LoadObjFile( ) function. This file can be enabled in your sample.cpp file by uncommenting its #include.
Incorporate the .obj file into your own code
by placing the .obj object into a display list, like this:
// a global:
int DinoDL;


// in InitLists( ):
	DinoDL = glGenLists( 1 );
	glNewList( DinoDL, GL_COMPILE );
		LoadObjFile( (char *)"dino.obj" );
	glEndList( );


// in Display( ):
	glCallList( DinoDL );
Warning! Not all obj files have normals.
Take a look at the lines in the obj file (it is ascii-editable).
If you see lines of text beginning with vn, it has normals.
Use the Teach system to turn in your:
Note: you don't get credit for these things by just having done them. You get credit by convincing us that your program's lighting behavior is correct. That is, you only get credit if you have made a video that demonstrates the correct visual lighting behavior.
| Item | Points |
| At least three objects | 10 |
| Point light works | 20 |
| Spot light works | 20 |
| Light in some pattern above the scene | 20 |
| Light changes color correctly | 20 |
| There is a small unlit sphere to show where the light source is | 10 |
| Potential Total | 100 |