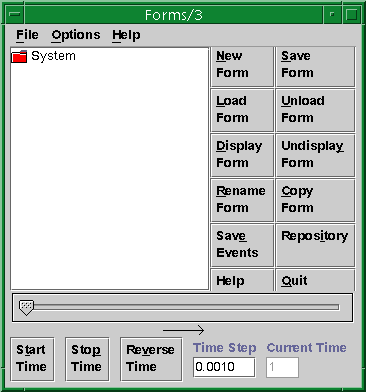
Figure 1 - Forms/3 Main Window. Click on the figure for a full-size (clearer) version.
Abstract: Forms/3 is a declarative visual programming language that aims to provide general-purpose programming language capabilities in a simple, spreadsheet-like approach. This report provides an example-driven introduction to programming in Forms/3.
TABLE OF CONTENTS
Introduction
Example 1 - Area of a Square: Concreteness and
Immediate Visual Feedback
Basic Operations on Cells and Forms
Example 2 - Graphics
Example 3 - User Defined Graphical Data Types
Example 4 - Recursion: From Concrete Forms to Reusable
Abstractions
Example 5 - Factorial: Use of Time
Example 6 - A Wheel on a Ramp: An Introduction
to Animation
Example 7 - Algorithm Animation: A Sort Algorithm
Appendix A: How to Execute Forms/3
Appendix B: Syntax for Cell Formulas
Appendix C: Keyword Options for the (run) Command
Appendix D: Forms/3 References
Introduction
Forms/3 is a spreadsheet-like Visual Programming Language (VPL). Its goal is to provide computational and expressive power in a language featuring a simple, concrete programming style with immediate feedback.
This document provides a view of Forms/3 from a user's perspective. It is by no means a complete language description. Rather, it simply presents a picture of what it is like to use Forms/3 through a set of examples. When used with a live system, it provides a guided tour. However, we have tried to make the descriptions complete enough to be useful even without a live system.
Example 1 - Area of a Square: Concreteness and Immediate Visual Feedback
Overview
Forms/3 borrows ideas from the spreadsheet paradigm; cells and formulas are the basic way that programming is done. This example shows how to use this method to calculate the area of a square.
Detailed Instructions
Load and execute Forms/3 as described in Appendix A. The Forms/3 main window, which is shown in Figure 1, should appear on the screen. The System form, which is listed on the main window in the list of forms loaded, always loads at system startup.
Figure 1 - Forms/3 Main Window. Click on the figure for a full-size (clearer) version.
1. Start by creating a form to work on. Click on the "New Form" button. A dialog box appears that prompts for the name of the new form. See Figure 2.
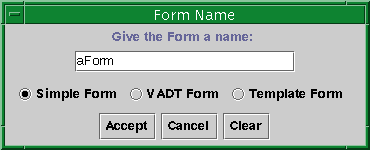
Figure 2 - A New Form Dialog Box. Click on the figure for a full-size (clearer) version.
A default name appears in the dialog box. Change the name of the form to Area_Box and click "Accept". A new form will appear called Area_Box.
2. Select the cell tool ![]() from
the palette to the left with the left button. (The left button is used
for selecting. The right button is used for other tasks). Click in the
upper left corner of the Area_Box form with the left button. A cell
will now appear. This cell consists of an outline with a formula tab. See
Figure 3.
from
the palette to the left with the left button. (The left button is used
for selecting. The right button is used for other tasks). Click in the
upper left corner of the Area_Box form with the left button. A cell
will now appear. This cell consists of an outline with a formula tab. See
Figure 3.

Figure 3 - A Form Containing a New Cell
3. A cursor appears on the default name of the cell, type in the name of the cell -- Abox in this case.
4. Click in the ![]() from
the palette to the left with the left button.
from
the palette to the left with the left button.
5. Click on the formula tab of the cell (![]() ).
This will show the formula of the cell. Click within the formula
box, the cursor will appear(see Figure 4) type the formula, in this case
the number
5. Click "Apply". The cell's value (5) is now displayed.
This is an example of immediate feedback - whenever you enter a formula,
all affected values are automatically displayed. Refer to Appendix B for
a full list of Forms/3 operators. If you want to close the formula
box, click on the "Hide" button.
).
This will show the formula of the cell. Click within the formula
box, the cursor will appear(see Figure 4) type the formula, in this case
the number
5. Click "Apply". The cell's value (5) is now displayed.
This is an example of immediate feedback - whenever you enter a formula,
all affected values are automatically displayed. Refer to Appendix B for
a full list of Forms/3 operators. If you want to close the formula
box, click on the "Hide" button.
6. Repeat steps 2-3 above and create another cell
to the right of the Abox cell and name it Area. ( Hint - If you
inadvertently create a new cell you can delete it by selecting it and then
clicking on ![]() on the palette
on the top of the form).
on the palette
on the top of the form).
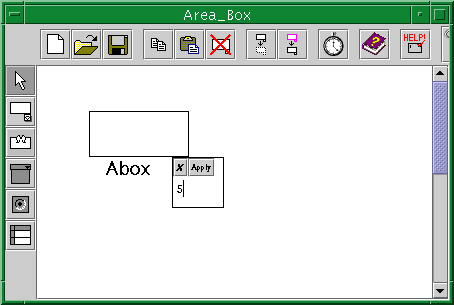
Figure 4 - A Formula Box with a Formula Entered
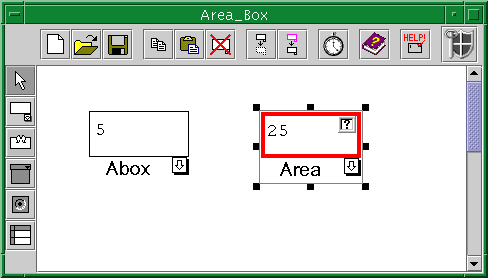
7. Now the area of the square will be calculated. Click on the formula tab for the Area cell. When the formula box appears type Abox and a space and a * and a space and then click on the Abox cell. (Spaces are NOT required to separate each token in a formula, such as separating the "*" operation from the 2 references to Abox.) This shows the two ways to refer to a cell - either by clicking on it, or by typing its name. Click "Apply".
8. Note that the Area cell now displays the number
25.
See Figure 5.
The cell border is red because the cell has not been "tested". (We
will not discuss testing further in the tutorial, but more information
about it is available by following the research links on
Margaret Burnett's home page.)
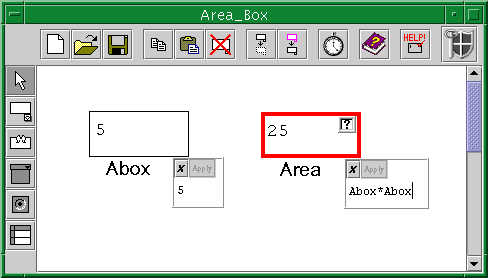
Figure 5 - The Completed Area_Box Form.
9. Click on the formula tab of cell Abox and change the 5 to a 6. Note that the Area cell now has the number 36 displayed.
10. Now save this form for later use. Refer to the Forms/3 main window and in the list of forms loaded, click on "Area_Box" to select it. Click on the button "Save Form". A dialog box asks you to specify a location (a standard UNIX path and a filename) in which to save the form. When you are ready, click on the "Save" button.
11. If you want to stop now click the "Quit" button on the Forms/3 main window.
Basic Operations on Cells and Forms
Continue using the "Area_Box" form which was saved in step 9 above. If you do not have this form on your screen follow the instructions in the following section, How to Load a Form. Otherwise skip to the section, How to Change the Size of a Cell.
How to Load a Form
From the Forms/3 main window click on the "Load Form" button. A dialog box appears which prompts for the path and filename in which the form was saved. When you've specified the file you want, click "Open".
(If nothing happens after a reasonable wait, then check the Lisp window.)
How to Change the Size of a Cell
Click inside the outline of the cell and without releasing the mouse move the cell to another position on the form.
How to Change the Cell Attributes
Several options are available to change the attributes
of a cell on a form. Click with the right button in the Abox cell.
A menu appears. See Figure 7. Click on the option "Hide border". You should
now see the Abox cell with no border displayed.
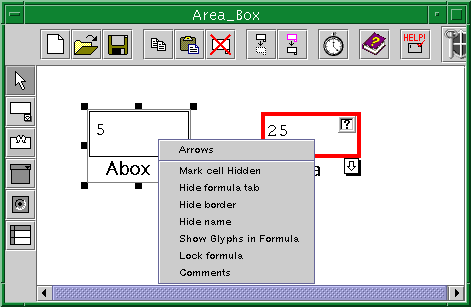
Figure 7 - A Cell Attribute Menu
How to Delete a Cell
A cell can be deleted from a form by selecting it and then clicking
on the button ![]() on the tool
pallet to the top of the form.
on the tool
pallet to the top of the form.
Help
The "Help" button on the Forms/3 main window gives basic information
about running Forms/3, and the "Form Help" button (![]() )
on every form gives useful information about that particular form.
)
on every form gives useful information about that particular form.
How to Quit
Click on the "Quit" button in the Forms/3 main window.
Example 2 - Graphics
Overview
In this example the form Area_Box from the previous exercise will be used. The Abox cell's formula will be changed so that the box can be represented by a graphical box rather than a number.
1. Begin by doing one of the following:
a. continuing from the end of Example 1 with the Area_Box window displayed.
b. loading the previously saved Area_Box form.
c. preparing an Area_Box form by following the instructions in Example 1 above.
Once this form is completed it should look similar to Figure 5.
2. Move the Area_Box window out of the way so that the Forms/3 main window can be seen. Create a new form and name it Graphic_Box.
3. In the upper right hand corner of this form create a new cell, name it H and enter the formula 50.
4. To the left of the cell defined in step 3 create a new cell called W and enter its formula as 50.
5. In the upper left hand corner create a new cell, call it AnewBox and for its formula enter:
box W H
When you accept the formula, a box appears as the value of the AnewBox cell.
6. Now change the formula of cell Abox on the Area_Box form to refer
to the graphical box just created. To do this change cell Abox so that
it is a reference to the AnewBox cell. Delete the current formula,
click on AnewBox and then accept the formula. Note that a box now appears
as the value of cell AnewBox, and also that references can be made across
forms.
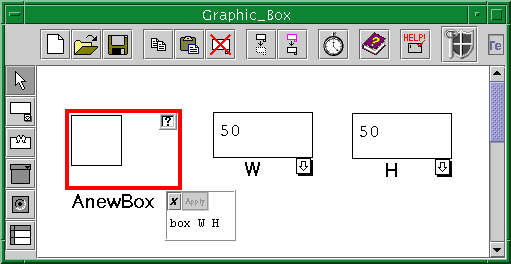
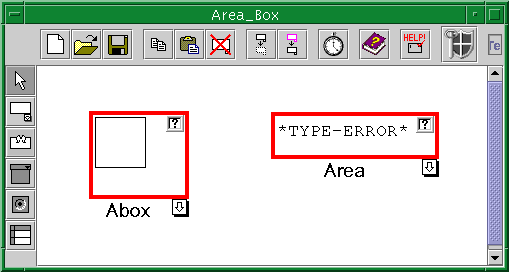
Figure 8 - Graphic_Box and Area_Box Forms.
The Area cell now shows a *TypeError* value. This is because there is no way to multiply boxes together. Open the formula for cell Area and change it to:
(width Abox) * (height Abox)
Notice that the Area cell now contains the correct area. Move to the Graphic_Box form and change the formula in the W cell to 30 and the formula in the H cell to 30. Note that the changes are propagated across both forms. If you want to stop now, click the "Quit" button on the Forms/3 main window.
Example 3 - User Defined Graphical Data Types
Overview
Forms/3 allows the user to define their own data types. Part of this definition includes how user-defined types should appear on the screen. We call these user-defined types "Visual Abstract Data Types (VADTs)."
Detailed Instructions
1. Start this exercise with a predefined VADT form. From the Forms/3 main window load:
VADT-Person
from the Forms/3 demo/examples directory.
2. The Person form should look like Figure 9 below.
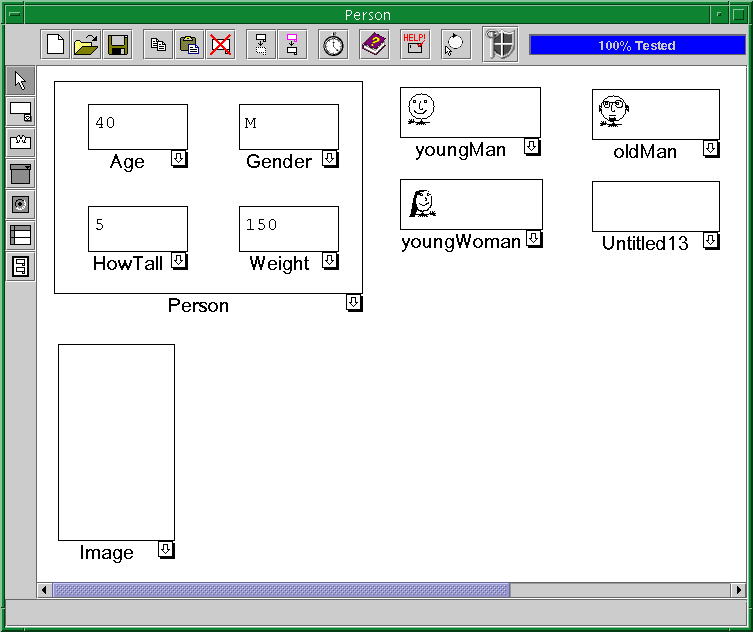
Figure 9 - The VADT Person Form. Click on the figure for a full-size (clearer) version.
The VADT Person form is a form that defines an abstract data type person. The user has specified that a person is implemented from the composite of its Age, Gender, Height (HowTall) and Weight. This exercise will define the appearance of an instance of type Person. To help with this task the cells at the right of the form, which contain bitmaps that were created with an ordinary X-Windows bitmap editor, will be used. Pull down the formula tabs to explore the formulas of the cells on the form. Note that one of the cells on the right is empty.
3. Name this empty cell old-woman and for the formula type:
glyph "/users/burnett/Resrch/Forms/demo/examples/VADT-Person.dir/oldwoman.bitmap"
4. Now create two additional cells, one to calculate the face and one to calculate the body. Do this below the Person VADT and to the right of the empty cell in the lower left-hand corner. Put a smaller cell on top of a longer cell as in Figure 10. The upper cell should be named Face and the lower cell Body.
5. The face will depend on Person's age and gender so the formula of the Face cell type should be entered:
if (Person[Age] < 20)
then (if (Person[Gender] = "M") then youngMan
else youngWoman)
else (if (Person[Gender] = "M") then oldMan else
old_Woman)
Tips: The Forms/3 parser works in a left to right manner, so parentheses are needed in complex expressions.
6. The formula for the body should refer to a graphical box. For the formula for Body enter:
box (Person[Weight] / 3) (Person[HowTall] * 10)
7. Move the Body cell directly under the Face cell. Make the Border, Formula Tab, and Cell Name attributes of the Face and Body cells be invisible.
8. Now make some changes to Person to see how they affect the appearance. Change Age to 4. The young-man face should appear. Change Gender to "F" and the young-woman face should appear. Change HowTall to 10 and a tall person should appear.
9. Now the face and body will be put together in the Image cell. For the formula of Image enter:
Compose Face at (0,0) with Body at (0, (Height Face))
If you prefer, you can demonstrate the above formula instead of typing it. To do so, first open the formula entry window as usual, then use the mouse to visually arrange the Face cell and the Body cell the way you want them, and finally rubberband the arrangement with your mouse.
In the Image cell notice that the young woman?s face with a tall body (or whatever formulas you had last entered in the Face and Body cells) appears.
Figure 10 below shows what the completed form looked like after the user arranged the Face cell and Body cell one directly above the other, and hid the names and borders of those two cells.
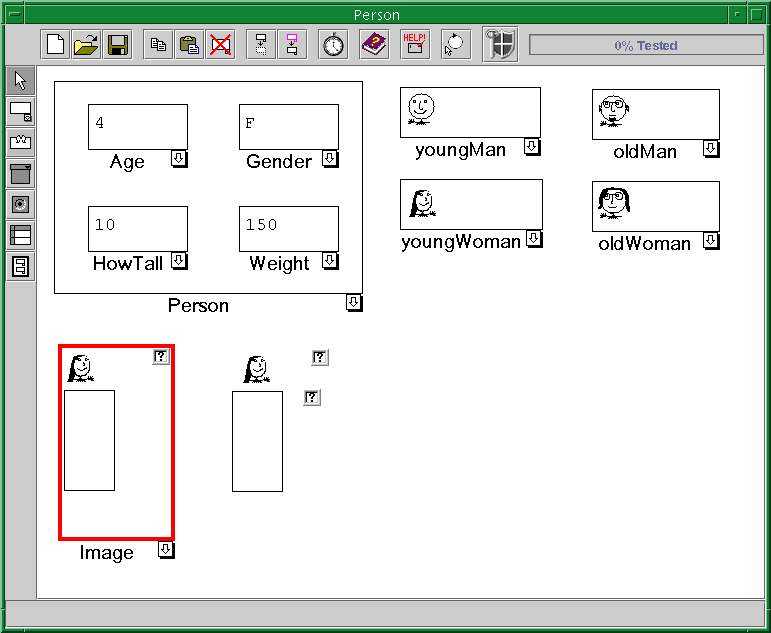
Figure 10 - The Completed VADT Person Form. Click on the figure for a full-size (clearer) version.
10. Change some of the values in Person, for example change HowTall to 6, and watch the Body change, both in the Body cell and in the Image cell.
At this point, the abstraction
box Person contains an instance of type Person. How can you tell that this
is the case? One way is to add another cell to the form and for its formula,
refer to Person. The value that appears looks like a Person (i.e., follows
the way the Image cell defines how Persons look). Another way to tell is
to push the "Hide-Cells" button (![]() ).
Doing so causes all the "hidden" (private) cells to disappear from view,
leaving only the encapsulated Person and non-hidden (public) cells for
outside use.
).
Doing so causes all the "hidden" (private) cells to disappear from view,
leaving only the encapsulated Person and non-hidden (public) cells for
outside use.
11. There is another example implementation of a person, which is time-based, in demo/examples/MyWorld.package. You may wish to look at Example 5 in this report before you explore this other example. When you are ready to proceed with it, load the package, then press the "Start Time" button on the Forms/3 main window to watch it run. When the program quits changing, press the "Stop Time" button and move the slider back to Time 1 before moving on to other examples.
Example 4 - Recursion: From Concrete Forms to Reusable Abstractions
Overview
A form allows the user to collect related calculations together into abstractions that can be reused, serving the same purposes as procedures, functions, or type definitions in other languages. In the following example, a form will be set up to concretely specify a reusable abstraction to calculate the n'th number in the Fibonacci sequence.
Recall that if we start counting at 0, the 0'th number
in the Fibonacci sequence is 1, followed by another 1, and then each number
after that is the sum of the preceding 2 numbers in the sequence. The program
will use a recursive approach.
Detailed Instructions
1. Create a new form and call it Fib. On this Form create two cells, the first on the upper-left should be named N with a formula of 5 and the second on the upper-right should be named Ans.
2. Create two more cells called N1 and N2. N1 should be on the lower left-hand corner and N2 on the lower-right hand corner of the Fib form.
3. N1 cell?s formula should be entered as N - 1 and N2 cell?s formula should be N - 2.
4. To make the rest of the exercise easier make the
Fib window smaller.
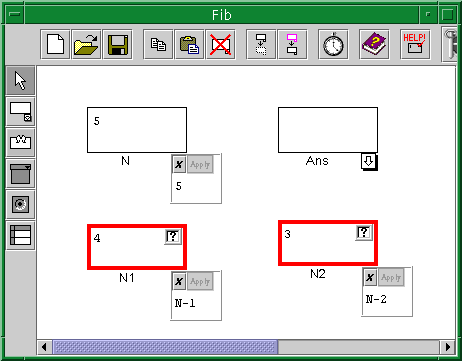
Figure 11 - The First Fib Form
5. Move the Fib form aside so that the Forms/3 main window can be seen. In the list of forms loaded, click on the Fib form to select it and then click on the "Copy Form" button. A form that we will refer to as Fib1 (but actually it will have some other name such as "78_Fib"), is produced and all of the cells and formulas from Fib have been propagated into it. The background of Fib1 is gray to indicate that it has been copied.
6. Copy form Fib again to produce a form we'll refer to as Fib2, and note that again the cells and formulas have been propagated into Fib2.
7. On the Fib1 copy, change N's formula to refer to N1 on the original Fib form. To do this, delete the 5 and then click on the N1 cell of the Fib form. (The idea is that Fib1 will calculate the N - 1st Fibonacci number). If you have done this correctly the formula for the Fib1 cell should be Fib:N1. Notice that the interior of the cell is now white to indicate that the formula on this copy has been changed.
8. On the Fib2 form change the value of the formula in the N cell to refer to the N2 cell on the Fib form. Delete the 5 and click on the N2 cell of the Fib form. The formula of the N cell of the Fib2 form should now say Fib:N2.
9. Notice that appropriate values have been changed
in the various cells on all forms.
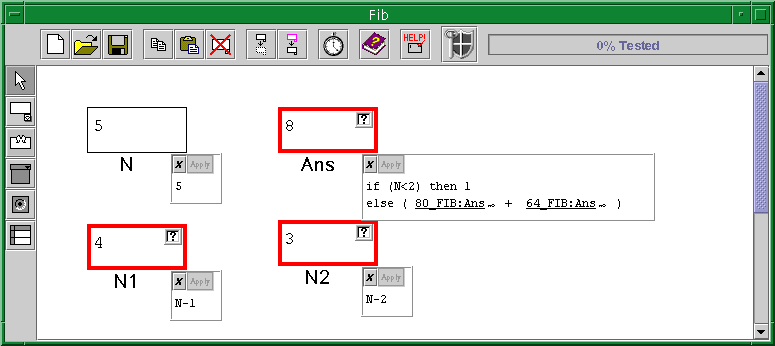
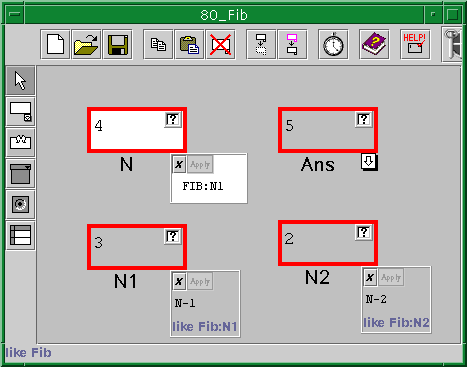
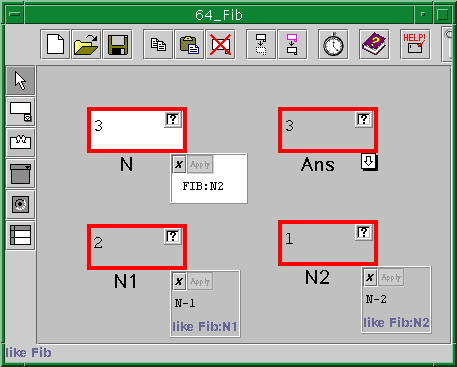
Figure 12 - The Completed Fib Forms. Click on the forms for a full-size (clearer) version.
10. Now for the recursive part. Move to the Fib form and in the formula of the Ans cell enter (by typing and clicking on cell references):
if (N < 2) then 1
else (Fib1:Ans + Fib2:Ans)
This formula for answer is exactly what we want for this cell, but when it is "accepted" it will be propagated to the 2 copies. But the formula is too concrete for the copies (Fib1 and Fib2). It must be generalized because the formula for the Ans cell on the Fib1 form will seem to be circular. This will also be true of the formula for the Ans cell on the Fib2 form .
11. The Forms/3 system will address this problem so click "Apply". It will analyze the relationships among the cells and automatically derive a generalized, reusable version of the formula.
12. To see the results of generalization, display the formula in the main part of the spreadsheet by clicking on the formula tab. The concrete cell references are now underlined, and there should be an arrow at the end of the formula you see; touch that arrow and a legend will appear showing the fully generalized meaning of each of the underlined concrete cell references.
13. If you want to see an example of the generalized cell references (or in fact any cell reference), you may click on the cell reference in the displayed formula, and a form showing a "concretized" version of it will pop into view.
14. To save this program (if desired) select Fib from the list of forms loaded and then click on the "Save Form" button. It is not necessary to save Fib1 and Fib2 as they are automatically regenerated (but not redisplayed) as needed by the generalized formulas on Fib. (Any undisplayed copies can always be redisplayed by selecting them from the list of forms and clicking on the "Display" button.)
15. Now unload the Fib Forms. Select Fib in the list of forms loaded. Then click on the "Unload Button". Notice that the Fib form and its associated Fib1 and Fib2 forms are all unloaded at the same time.
Example 5 - Factorial: Use of Time
Overview
In Forms/3, a cell's formula can be used to define a sequence of values over time. This example shows how to do this, and how to use the Time Slider to navigate through time.
Detailed Instructions
1. Open a new form and name it factorial.
2. Create a cell called Counter and in the formula box enter:
1 fby ((earlier Counter) + 1)
"fby" stands for "followed by", and is one way to define a sequence of values over time. Notice that after entering the formula, the cell's value shows 1. This is because we are currently positioned at the beginning of the time sequence.
3. Create a cell called Fact and enter the formula:
1 fby ((earlier Fact ) * Counter)
At this stage your form should look like Figure 13
below.
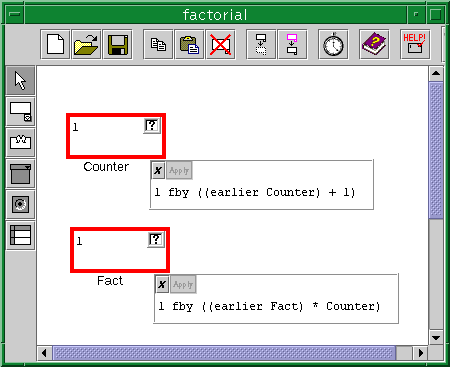
Figure 13 - Completed factorial form. Click on the figure for a full-size (clearer) version.
4. Now bring the Forms/3 main window to the front (keep this form and the factorial form on the screen in positions where you can observe them simultaneously). Refer to Figure 1 for the rest of the discussion on this exercise. Notice at the bottom of the Forms/3 main window the "Start Time", "Stop Time", and "Reverse Time" buttons. Click on the "Start Time" button and watch the values changing on the factorial form.
5. Click on the "Stop Time" button to stop the progression of time. Now click on "Reverse Time" and then "Start Time". Observe the factorial form redisplaying the saved values in reversed sequence.
6. Stop time. Now explore the factorial values at various moments in the sequence by forward and backward through time using the scrollbar.
7. A default value is given for the Time Step box
in the lower-left corner. This can be edited to increase or decrease the
speed that the system moves through time.
Example 6 - A Wheel on a Ramp: An Introduction to Animation
Overview
Formulas can be used in Forms/3 to define animations over time. This example uses an animated rolling wagon wheel program to show how to do "on-the-fly" exploratory programming or debugging by exploiting the fact that any Forms/3 program can be executed forwards or backwards.
1. First make sure the time slider bar has been moved back to the beginning. (Otherwise, there could be quite a long wait from when you load the next package until you see results on the screen.) Load the wagonWheel.package from the demo/examples/ subdirectory.
2. The following forms load: several eventReceptor
forms, an animationForm, a wheelInput and a wheelOutput form. The animationForm
(see Figure 14) is the rolling wheel part of the program. The wheelInput
form (see Figure 15) allows you to specify the slope of the ramp (and other
parameters which can be seen by pulling down and enlarging the window.)
The wheelOutput form (see Figure 15), combines the rolling wheel, ramp,
and user controls to start and stop the rolling wheel.
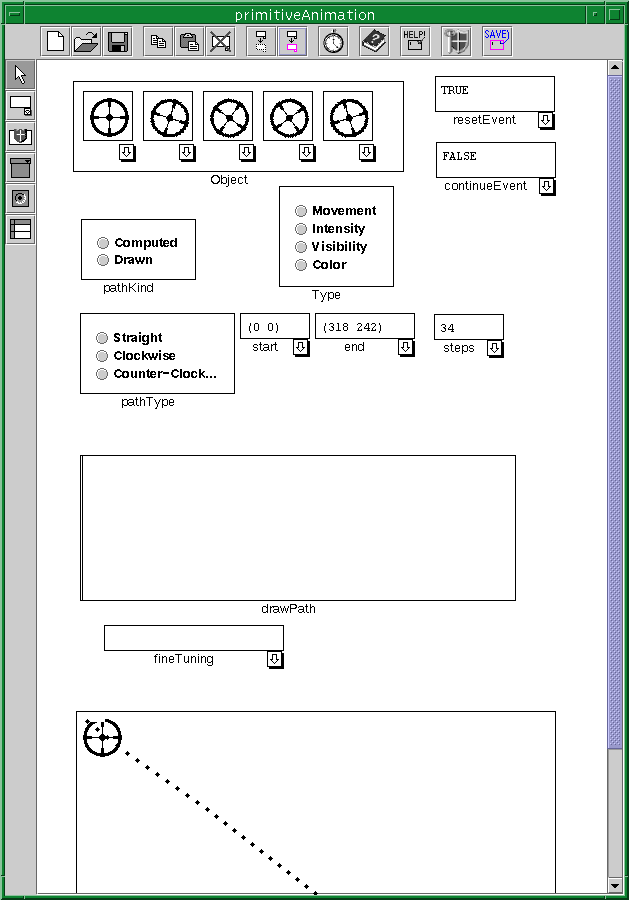
Figure 14 - The animationForm Window.
Click on the figure for a full-size (clearer) version.
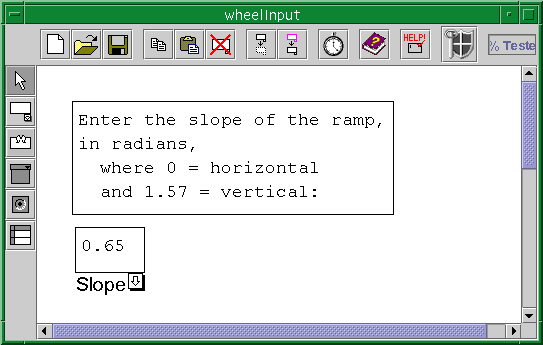
Figure 15 - The wheelInput and wheelOutput Forms. Click on the figure for a full-size (clearer) version.
3. Some eventReceptor forms were also loaded, but they have automatically been iconified on your screen. To view these forms, click on their name on the main window and then click on the button "Display Form".
4. Start by watching the animation. Go to the Forms/3 main window and from the list of forms loaded, select wheelOutput and click on the "Display Form" button. wheelOutput should now be the front window. Move it aside so that you can see both it and the Forms/3 main window at the same time. Animation is a time based operation, so start time on the Forms/3 main window.
5. Now click on the "Start" button on the wheelOutput form and the wheel will move down the ramp until the you press the "Stop" button. Note that time has changed in the Forms/3 main window. In the Forms/3 main window, drag the time to the left and watch the wheel retrace its route.
6. Stop time, then use the time slider to move time to about 5, and finally change the slope on the wheelInput form to 0.80. In Forms/3 an animation can be modified mid-execution and will give immediate feedback about the effects of those modifications. Note that the wheel?s position and all related values have been updated to reflect the same point in time that the animation was at before the modification was made.
7. Any Forms/3 program can be executed in either a forward or backward direction. The direction can be toggled at any time by simply clicking the "Stop Time", "Reverse Time" and "Start Time" buttons, permitting you to examine any portion of the execution as many times as desired without restarting the entire program. Click on "Stop Time", "Reverse Time", and "Start Time" now, and watch the wheel roll back up the ramp.
8. Stop time and move the time slider back to time 1. Now move to the animationForm and click the "Drawn" pathKind button (in the horizontal middle of the form near the top). Using your mouse (while any mouse button is down inside the drawPath cell) drag a path in the drawPath cell. When the mouse button is released, the list of offsets constituting the path is placed in the fineTuning cell, where you can make precise adjustments (0 0 is the upper left hand corner). Start the wheel moving on the path by following the sequence of events in step 4, above.
Tips: The AnimationForm
Animation is visually programmed in Forms/3 by specifying the animation parameters on this form (see Figure 14). The Object matrix, the Type, the resetEvent, the continueEvent, and the Path cells are the inputs to the animation, and the Animation cell at the bottom of the form renders the transition of the object along the path. The Object matrix contains the object(s) to be animated. An object can be any type, including primitive objects such as boxes, bitmaps, and strings. When the Object matrix contains more than one object, as in Figure 14, the animation repeatedly cycles through the matrix, displaying one object per animation frame. Here, the differences between the three glyphs of the Object matrix cause the wagon wheel to rotate as it moves down the ramp.
The Type cell contains the transition type of the animation. The programmer uses the radio buttons to select from the four primitive transition types.
Whenever the resetEvent cell is true, the animation is restarted from the beginning of the path. Whenever the continueEvent cell is true, the next animation frame in the transition is rendered in the Animation cell. The resetEvent cell has precedence over the continueEvent cell.
The value of the Path cell is the relative path that the animation follows. The programmer indicates, by selecting the appropriate radio button, whether the path is to be computed or drawn. More information can be obtained by referring to the relevant references in Appendix D.
Example 7 - Algorithm Animation: A Sort Algorithm
Algorithm animation has been seamlessly integrated
into Forms/3. This is not a special-purpose visual algorithm animation
system for animating algorithms implemented in other languages, but rather
an animation system for algorithms programmed in Forms/3.
1. First make sure the time slider bar has been moved back to the beginning. Now load the matrixSort.package from the demo/examples subdirectory.
A Sort form and a sortOutput form appear. Some primitiveAnimation forms have also been loaded in iconified form. On the Forms/3 main window click on the "Start Time" button and watch the sorting process in the Sort window. Click on the "Stop Time" button at any time to observe values in cells or to navigate manually through time. More information can be obtained about this example and algorithm animation from the references in Appendix D.
At your X-terminal:
xhost +hostname
(For example xhost +twiddle. On some computers the xhost path needs to
be typed in,
e. g. /usr/local/X11/xhost).
setenv DISPLAY your workstation:0
(For example setenv DISPLAY twiddle:0)
cd to the Forms directory.
At the UNIX prompt type:
lispserver
Open a second terminal. On your second X-terminal, using the same host:
cd to the JavaForms directory
At the the Unix prompt type:
javaforms <port number provided by lisp>
As soon as the system's initialization is completed, the Forms/3 main window should appear.
Example from CS research net, assuming I'm in sitting front of the machine twiddle.cs, and want to actually execute Forms/3 on the machine trek.cs:
If the port number, for example, is 49152
cd ~burnett/Resrch/Forms/src/JavaForms
javaforms 49152
xhost +flop.engr
ssh flop.engr
cd ~burnett/Resrch/Forms/src/JavaForms
setenv DISPLAY twiddle.cs:0
javaforms 49152
Common problems and their
solutions
1. You may have a problem opening your display, getting a message such as:
   Error: Connection failure to X11.0 server gold.cs display 0:
   Client is not authorized to connect to Server

   XLIB::X-ERROR
      Required arg 0 (CONDITION): XLIB:CONNECTION-FAILURE
      Rest arg 1 (KEYARGS): (:MAJOR-VERSION 11 :MINOR-VERSION 0
        :HOST "twiddle.cs"
        :DISPLAY 0 :REASON "Client is not authorized to connect to Server")
To solve this problem, first type (quit) to exit the Lisp implementation, then use xhost and setenv as described at the beginning of this appendix, and rerun Forms3.
2. If you have any other kind of X-Windows error, such as complaints about being unable to allocate colors or other X resources, you should type (quit) to exit the Lisp implementation, exit a few other applications on your desktop, and then rerun Forms3. For these kinds of messages, Netscape is the usual culprit, and exiting it will usually make the problem go away.
Another solution that often works is to quit both Forms3 and Netscape, then restart them both as follows: (quit) Forms/3, exit Netscape, then restart Netscape with the -install option, that is, type netscape -install, and finally restart Forms/3.
|
|
|
|
| Text | quotedString | "Hi"
Any leading blanks before the initial quote mark will be removed before the text is displayed. |
| Algebraic Expressions | Use infix notation. Integer and floating
point numbers are accepted.
|
Operators include + - * /
The mod function is allowed with format: (numerator mod denominator). The numerator and denominator may be numbers or cell references. * Operators and operands must be separated by at least one blank. For example, 3*4 will cause an error. 43 43 + 57 (cell reference * (100 - 53)) |
| Cell references | Click on the cell or type the name of the cell. Case is ignored. | * |
| Logical Expressions | A op B
not A not (A and B). A and B are numbers, cell references, boolean expressions or more complex expressions |
A space must be placed between each operator
and operand.
The operators not, and, or are to be used for booleans variables. Their use on other types of data gives unpredictable results. The operators =, <, , <=, = can be used with numbers |
| Booleans | t, f,
true or false |
|
| Box | box Width Height | Example: box 20 (10 * 2 )
Defines a 20 x 20 box. |
| Line | Line or line delta_x delta_y | Example: line 20 30 is a line from (0,0) to (20,30) |
| Width | Width someOperand | width X |
| Height | Height someOperand | height (box 20 20) |
| Glyph or Bitmap | glyph bitmap-filename | glyph "~/examples/fish.bm"
Bitmaps can be created using X?s "bitmap" utility. Please give the full pathname for the bitmap file . |
| ComposeCentered | composeCentered X with Y | ComposeCentered is one word.
Centers Y over X horizontally and vertically. Example: ComposeCentered (box 20 200) with (box 10 10) |
| Compose | compose X at (x1,y1) with Y at (x2,y2) with Z at (x3, y3) with ... | Compose one object at a certain location,
or compose two or more things together. Examples:
compose box1 at (10, 10) compose (box 10, 10) at (50, 50) with (circle 8) at (25, 25) with "hey" at (15, 15). |
| if/then/else | if cond then E1 else E2 | if ( N 0) then 1 else 2
|
| fby | 0 fby 1
Count fby 1 until done |
Initial value of 0, followed by 1 at
the next moment in time
Initial value of Count, followed by 1 until done |
| earlier | earlier (N + 1) initially 0 until (countDone)
earlier (N + 1) initially 0
earlier (N + 1) |
Suppose this is the formula for cell N. Then N's initial value is 0, and then increments by 1 over time until countDone is true |
| prev | prev (N + 1) initially 0 until (countDone)
prev (N + 1) initially 0 prev (N + 1) |
|
| Misc. | sin x
cos x round x -number |
(x is in radians)
(x is in radians) round (12/5) (this is unary minus) e.g., -3 + X |
Appendix C: Keyword Options for the (run) Command
(run [:keyword option])
|
|
|
|
| dm | Direct manipulation | T - point/click cell reference and text
entry (DEFAULT)
NIL - Text entry only |
| bigfont | Big font used in the video tape | NIL - default font (DEFAULT) |
| memoryhog | Memory intensive runs. Bumps Lisp's memory from 40MB to 100 MB | NIL- 100 MB (DEFAULT)
t - 40MB |
| timeadvance | Time moves forward (or backward); one logical second approximately every physical second | T - Time starts moving forward immediately.
NIL - You can move time manually using the time slider, or you can start the automatic movement at any time. To start time, enter (inter:start-animator $TimeAdvance). To stop time, enter (inter:stop-animator $TimeForward nil) To make time run backwards, enter (setf $TimeForward nil). NOTE: If time is running backwards and it gets to time ? (1), it will automatically reverse and run forwards. |
Appendix D: Forms/3 References
Dissertations
"Abstraction in the demand-driven, temporal-assignment, visual language model", Margaret Burnett, PhD Dissertation, University of Kansas, 1991.
"Representation Design Benchmarks: A Design-Time Aid for VPL Navigable Static Representations" Sherry Yang, Margaret Burnett, Elyon DeKoven, Moshe Zloof, Journal of Visual Languages and Computing, October/December 1997.
"Scaling Up Visual Programming Languages" (html), M. Burnett, M. Baker, C. Bohus, P. Carlson, S. Yang, P. van Zee, Computer, March 1995.
"Interactive Visual Data Abstraction in a Declarative Visual Programming Language", Margaret Burnett and Allen Ambler, Journal of Visual Languages and Computing 5(1), 29-60, March 1994.
"Graphical Definitions: Making Spreadsheets Visual through Direct Manipulation and Gestures", (available in Postscript, or gzip'd Postscript), Herkimer J. Gottfried and Margaret M. Burnett, 1997 IEEE Symposium on Visual Languages, Capri, Italy, September 23-26, 1997.
"Supporting Reuse of Evolving Visual Code", (available in Postscript, or gzip'd Postscript), Rebecca A. Walpole and Margaret M. Burnett, 1997 IEEE Symposium on Visual Languages, Capri, Italy, September 23-26, 1997.
"Retire Superman: Handling Exceptions Seamlessly in a Declarative Visual Programming Language", (available in Postscript or gzip'd Postscript), P. van Zee, M. Burnett, M. Chesire, 1996 IEEE Symposium on Visual Languages, Sept. 1996.
"Steering Programs via Time Travel" (available in Postscript or gzip'd Postscript), John Atwood, Margaret Burnett, Rebecca Walpole, Eric Wilcox, and Sherry Yang, 1996 IEEE Symposium on Visual Languages, Sept. 1996.
"A Seamless Integration of Algorithm Animation into a Declarative Visual Programming Language" (gzip'd Postscript), P. Carlson, M. Burnett, J. Cadiz, Proceedings Advanced Visual Interfaces (AVI'96), May 1996.
"From Concrete Forms to Generalized Abstractions through Perspective-Oriented Analysis of Logical Relationships" (available in Postscript or gzip'd Postscript), Sherry Yang and Margaret Burnett, 1994 IEEE Symposium on Visual Languages, St. Louis, Missouri, 6-14, October 4-7, 1994.
"Types and Type Inference in a Visual Programming Language" (Postscript),Margaret Burnett, 1993 IEEE Symposium on Visual Languages, Bergen, Norway, 238-243, August 24-27, 1993.
"Is It Easier to Write Matrix Manipulation Programs Visually or Textually? An Empirical Study" (Postscript), Rajeev Pandey and Margaret Burnett, 1993 IEEE Symposium on Visual Languages, Bergen, Norway, 344-351, August 24-27, 1993.
"A Declarative Approach to Event-Handling in Visual Programming Languages" (Postscript), Margaret Burnett and Allen Ambler, 1992 IEEE Workshop on Visual Languages, Seattle, IEEE Computer Society, 34-40, September 1992.
This work was performed at the Department of Computer Science, Oregon State University, and was supported in part by the National Science Foundation and by Harlequin.
Last modified: April 30, 2001.
Margaret M. Burnett, burnett@cs.orst.edu